
Norton™ Security
Product Manual
Norton™ Security Product Manual
The software described in this book is furnished under a license agreement and may be used only in
accordance with the terms of the agreement.
Documentation version 8.5.4
Copyright © 2020 Symantec Corporation. All rights reserved.
The product described in this document is distributed under licenses restricting its use, copying, distribution,
and decompilation/reverse engineering. No part of this document may be reproduced in any form by any
means without prior written authorization of Symantec Corporation and its licensors, if any.
THE DOCUMENTATION IS PROVIDED "AS IS" AND ALL EXPRESS OR IMPLIED CONDITIONS,
REPRESENTATIONS AND WARRANTIES, INCLUDING ANY IMPLIED WARRANTY OF
MERCHANTABILITY, FITNESS FOR A PARTICULAR PURPOSE OR NON-INFRINGEMENT, ARE
DISCLAIMED, EXCEPT TO THE EXTENT THAT SUCH DISCLAIMERS ARE HELD TO BE LEGALLY
INVALID. SYMANTEC CORPORATION SHALL NOT BE LIABLE FOR INCIDENTAL OR CONSEQUENTIAL
DAMAGES IN CONNECTION WITH THE FURNISHING, PERFORMANCE, OR USE OF THIS
DOCUMENTATION. THE INFORMATION CONTAINED IN THIS DOCUMENTATION IS SUBJECT TO
CHANGE WITHOUT NOTICE.
The Licensed Software and Documentation are deemed to be commercial computer software as defined
in FAR 12.212 and subject to restricted rights as defined in FAR Section 52.227-19 "Commercial Computer
Software - Restricted Rights" and DFARS 227.7202, et seq. "Commercial Computer Software and
Commercial Computer Software Documentation," as applicable, and any successor regulations, whether
delivered by Symantec as on premises or hosted services. Any use, modification, reproduction release,
performance, display or disclosure of the Licensed Software and Documentation by the U.S. Government
shall be solely in accordance with the terms of this Agreement.
Symantec Corporation
350 Ellis Street,
Mountain View, CA 94043
http://www.symantec.com

Chapter 1 Welcome to Norton ............................................................... 6
Get started with Norton for Mac ......................................................... 6
System requirements for Norton Security ............................................ 7
Chapter 2 Downloading and installing Norton .................................. 8
Download and install Norton ............................................................. 8
Install Norton on additional devices .................................................. 10
Transfer your Norton license to a new device ..................................... 12
Activate or renew your Norton on Mac .............................................. 13
Chapter 3 Understanding and responding to threats .................... 14
Repair, restore, or delete files on your Mac that Norton
quarantined ........................................................................... 14
Run LiveUpdate to keep Norton up to date on Mac .............................. 15
Chapter 4 Managing your security ..................................................... 17
View or customize tasks that Norton performs to protect your Mac
........................................................................................... 17
View or customize network activities that Norton monitors on your
Mac ..................................................................................... 19
Chapter 5 Scanning your Mac ............................................................. 21
Run Norton scans to check for threats on Mac .................................... 21
Change Norton Automatic Scans settings on Mac ............................... 23
Schedule Norton scans on Mac ....................................................... 23
Set Norton to scan your Mac while you’re away .................................. 24
Chapter 6 Keeping secure on the Internet ........................................ 25
Vulnerability Protection .................................................................. 26
Set Norton Firewall to block malicious websites from accessing your
Mac ..................................................................................... 26
Turn off or turn on Vulnerability Protection ......................................... 28
Exclude or include attack signatures on Mac ...................................... 28
Contents

Enable or disable notifications for blocked attack signatures on
Mac ..................................................................................... 29
Firewall settings for Mac ................................................................ 30
Firewall rule for IP addresses on Mac ............................................... 32
Configure firewall rules for an IP address on Mac ................................ 32
Modify firewall rules for an IP address on Mac .................................... 33
Remove firewall rule for an IP address on Mac ................................... 34
Advanced protection for Mac .......................................................... 34
Disable or enable advanced protection features on Mac ....................... 35
Configure Norton DeepSight Community Download on Mac .................. 36
Configure AutoBlock settings on Mac ............................................... 36
Configure Signatures settings on Mac ............................................... 37
Upgrade to the latest Norton version to better protect your Mac ............. 38
Help Norton Community Watch identify potential new threats on
Mac ..................................................................................... 40
Send reports to Symantec if Norton encounters an error on Mac ........... 40
Chapter 7 Keeping your Mac tuned up .............................................. 42
Run Norton Clean to remove files that can slow down your Mac ............ 42
Schedule or customize Norton Clean scans to help improve your Mac’s
performance ......................................................................... 43
Chapter 8 Securing your sensitive data ............................................ 45
Set Norton to detect fraudulent or phishing websites on Mac ................. 45
Add Norton browser extensions to surf and shop more securely on
Mac ..................................................................................... 46
Chapter 9 Customizing settings .......................................................... 51
Connection Blocking settings for Mac ............................................... 52
Configure Connection Blocking settings on Mac .................................. 52
Access settings for an application .................................................... 54
Configure the access settings for an application .................................. 54
Access settings for a service ........................................................... 56
Configure the access settings for services ......................................... 56
Customize the specific access settings for a service ............................ 58
Edit the access settings for a service ................................................ 60
Remove the access settings for a service .......................................... 62
Configure firewall for an application on Mac ....................................... 63
Set up firewall rules for an application on Mac .................................... 64
Remove the firewall rule for an application on Mac .............................. 65
Location Awareness settings for Mac ................................................ 65
4Contents

Disable or enable Location Awareness on Mac ................................... 66
Export the connection blocking settings for a network location ............... 66
Stop background tasks when you play games or watch movies on
Mac ..................................................................................... 67
Chapter 10 Finding additional solutions ............................................. 68
Check for virus names and definitions ............................................... 68
Find your product key or PIN for Mac ................................................ 69
Check your Mac user account type .................................................. 69
Uninstall Norton device security on Mac ............................................ 70
5Contents

Welcome to Norton
This chapter includes the following topics:
■ Get started with Norton for Mac
■ System requirements for Norton Security
Get started with Norton for Mac
Norton protects your Mac in the following ways:
■ Defends against viruses, spyware, malware, phishing, trojan horses and other online threats.
■ Helps protect your private and financial information when you go online.
■ Utilizes one of the largest global civilian intelligence networks to spot threats faster.
When you launch Norton on your Mac, you can access important features by clicking the tiles
in the main window:
■ Security
Make sure that your device is protected and fix issues if your computer is at risk or needs
attention. With most Norton subscriptions, you can also add devices to your Norton account
if you have seats remaining in your account.
■ Scans
Run a Quick Scan, Full Scan, or File Scan to check for threats on your device and schedule
scans. For more information, see See “Run Norton scans to check for threats on Mac”
on page 21.
■ LiveUpdate
Check that you have the latest protection from threats as well as feature and performance
enhancements. For more information, see See “Run LiveUpdate to keep Norton up to date
on Mac” on page 15.
■ Advanced
1
Chapter

View and change settings for your desktop and online activities. For most users, the default
settings provide the right level of protection, but you can customize security and network
settings.
■ Clean
Run scans to remove a range of junk files that can slow your computer down. For more
information, see See “Run Norton Clean to remove files that can slow down your Mac ”
on page 42.
System requirements for Norton Security
Operating system
Your Norton product is supported only on Mac OS X 10.7.5 (Lion) or later. If your Mac runs
on OS X 10.6 or earlier, upgrade your Mac operating system to the supported version.
Hardware
■ Mac computer with Intel® Core 2 Duo, core i3, Core i5, core i7, or Xeon processor)
■ 2 GB of RAM
■ 300 MB of available hard disk space
■ Internet connection for LiveUpdate
Browsers Supported
■ Safari®
1, 2
■ Mozilla Firefox®
1, 2
■ Google Chrome™
1
1
As made available by Symantec within your service period.
2
Supports current and the most recent previous 32-bit major releases.
7Welcome to Norton
System requirements for Norton Security

Downloading and installing
Norton
This chapter includes the following topics:
■ Download and install Norton
■ Install Norton on additional devices
■ Transfer your Norton license to a new device
■ Activate or renew your Norton on Mac
Download and install Norton
Protecting your devices and managing your Norton product is as easy as adding a new device
to your Norton account.
To download and install Norton on your computer
1
Sign in to Norton.
2
If you are not signed in to your account, enter your email address and password, and then
click Sign in.
If you do not have an account, click Create an Account, and then complete the sign-up
process.
2
Chapter
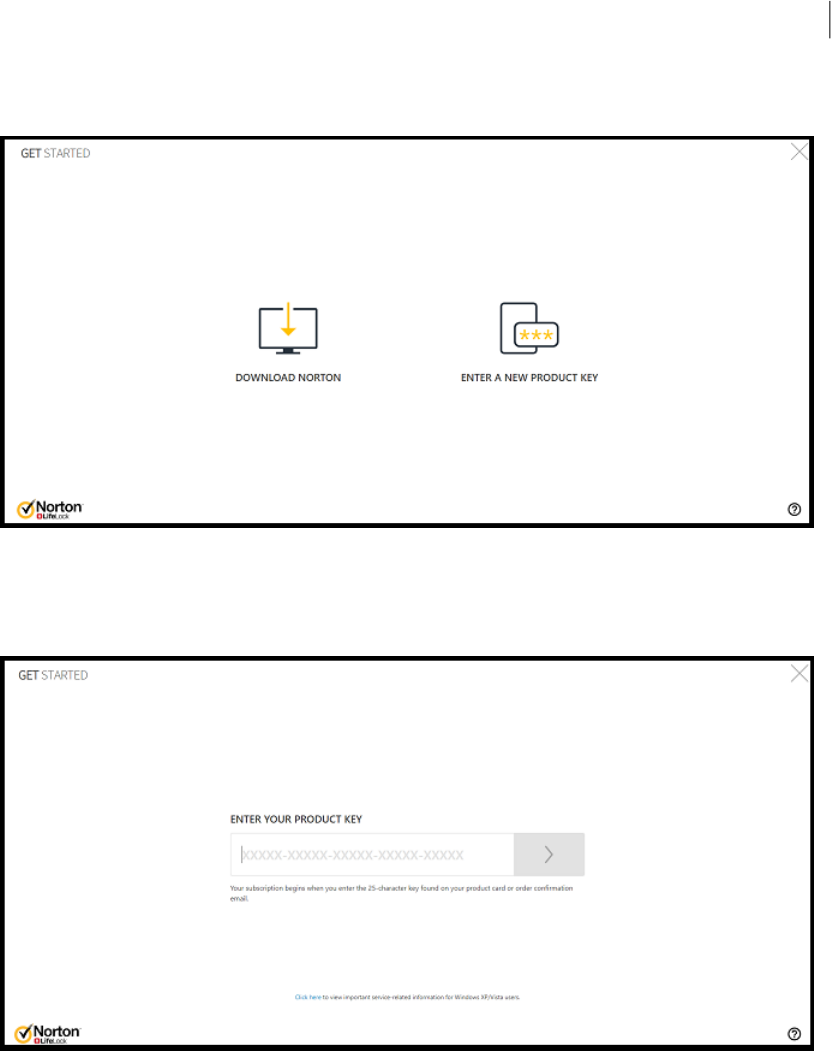
3
In the Get Started window, click Download Norton.
To install a new product that is not yet registered to your Norton account, click Enter a
New Product Key.
Enter your product key and click the next (>) icon.
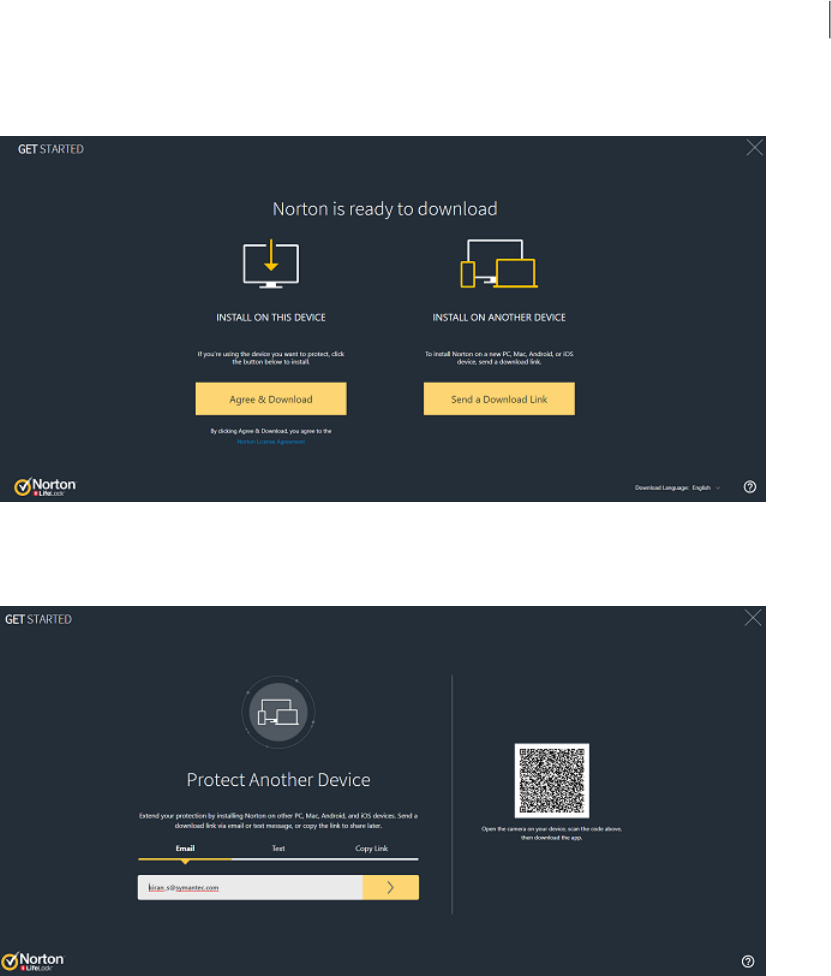
4
Click Agree & Download.
9Downloading and installing Norton
Download and install Norton
5
Click the area pointed by the on-screen blue arrow and follow the on-screen instructions.
■ For Internet Explorer or Microsoft Edge browser: Click Run.
■ For Firefox or Safari: On the top-right corner of the browser, click the Download option
to view the downloaded files, and double-click the file that you downloaded.
■ For Chrome: On the bottom-left corner, double-click the file that you downloaded.
6
If the User Account Control window appears, click Continue.
7
Your Norton product gets downloaded, installed, and activated.
Install Norton on additional devices
From your Norton account, you can send emails to additional devices and install Norton on
the devices. The email contains the install link and instructions to install Norton.
To install Norton on a different device
1
Sign in to Norton.
2
If you are not signed in to your Norton account, enter your email address and click Sign
In.
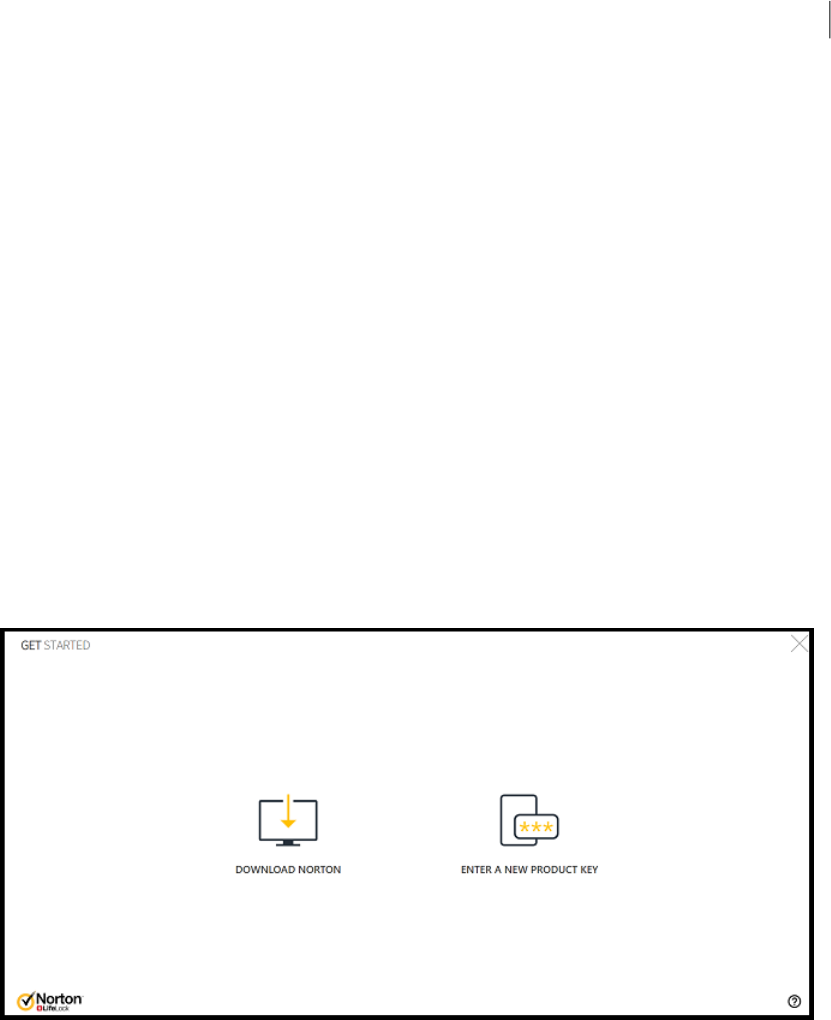
3
In the Get Started window, click Download Norton.
10Downloading and installing Norton
Install Norton on additional devices
4
In the page that appears, click Send a Download Link.
5
Enter an email address that you can access on your additional device and click the send
button, and then click Done.
An email is sent to the email address with instructions to install the Norton product.
6
On the device where you want to download Norton, locate and open the email that you
received from The Norton Team.
7
Click Download Now.
11Downloading and installing Norton
Install Norton on additional devices

8
Click Agree & Download.
9
Save the file on your computer and double-click the file to install Norton. By default, the
file is saved in the Downloads folder on both Mac and Windows computers.
Follow the on-screen instructions.
Transfer your Norton license to a new device
If your Norton product is installed on a device that you no longer use, you can transfer your
Norton product from that device to another device using your Norton account.
Transfer the Norton license
1
Sign in to your Norton account.
2
In the Devices page, identify the device that you no longer want to protect.
Note: The device must appear with a green status. If the device that you no longer use
appears with a red or an orange status, you can remove the device from your Norton
account and free a license.
3
Click the ellipse icon available below the device.
4
In the menu that appears, click Manage License.
5
In the Manage Device page, do the following:
■ Click on the device name.
■ Under What would you like to do, click Remove Norton.
■ Click Next.
6
In the Remove Norton window that appears, click Yes.
7
In the page that appears, click Install Now.
8
In the Install on New Device page, select one of the following:
■ To install Norton on the current device, click Download.
■ To install Norton on a different device, click Send Link.
9
Click Next.
10
Follow the on-screen instructions to complete the installation.
12Downloading and installing Norton
Transfer your Norton license to a new device

Activate or renew your Norton on Mac
Product activation reduces software piracy and ensures that you use authentic Symantec
software. Activation provides you with a specified period of subscription to your Norton product.
If you did not activate your product after installation, you receive a Subscription alert regularly
until you activate the product. You must activate your product within the time period that the
alert specifies, or your product stops working. To activate, you need to use the product key
that was included with this product. You can also renew your subscription to continue using
your Norton product.
If you are connected to the Internet, the Norton product prompts you to enter your Norton
account credentials. You can use your existing Norton account or register for a new Norton
account. After signing in to your Norton account, you can enter the product key to activate
your Norton product and register the product key to your Norton account. Your Norton account
lets you view the details, such as the product key, the product registration date, and recent
product updates.
Activate your product from the alert
1
In the alert, select Activate Now.
2
Follow the on-screen instructions to activate your product.
Activate your product from the main window
1
Start Norton.
If you see the My Norton window, next to Device Security, click Open.
2
In the Norton product main window, click Activate Now.
3
In the window that appears, click one of the following options:
■ Activate Now: Follow the on-screen instructions. You might be asked to enter the
product PIN, which your service provider issued.
■ Skip: Use this option to activate your subscription later.
13Downloading and installing Norton
Activate or renew your Norton on Mac

Understanding and
responding to threats
This chapter includes the following topics:
■ Repair, restore, or delete files on your Mac that Norton quarantined
■ Run LiveUpdate to keep Norton up to date on Mac
Repair, restore, or delete files on your Mac that
Norton quarantined
When Norton detects a threat that cannot be eliminated with the latest virus definitions, it
quarantines impacted files so that they cannot spread or infect your Mac. You cannot view
files in the Finder or use them if they are quarantined.
Some apps that you use may need to access files that Norton classifies as threats and therefore
quarantines. For example, many shareware or freeware apps download adware that introduce
vulnerabilities. These apps will not work if Norton quarantines the adware files that they need
to operate.
Norton displays File in Quarantine window to view additional details of the infected files that
has been quarantined. If new virus definition is received, you can attempt to repair the
quarantined item. Some quarantined items are successfully disinfected after your Norton
product rescans them. You can also restore such items.
Note: Symantec recommends you not to restore the quarantined files, unless you are sure
that they are safe. If you restore an item to a directory other than its original location, it may
not function properly. Therefore, it is recommended that you reinstall the program.
3
Chapter

In some cases, Norton displays File Deleted window which indicates that Norton automatically
detects and moved the specific infected file to Trash or deleted the file from your Mac that
cannot be repaired. If the file cannot be repaired, the file is either moved to Quarantine or
deleted.
Repair, restore, or delete a file in Quarantine
Some quarantined items can be repaired after Norton downloads virus updates and rescans
them.
1
Start Norton.
If you see the My Norton window, next to Device Security, click Open.
2
In the Norton product main window, click Advanced or Settings.
3
On the left pane, click Activity.
4
In the Security History row, click the view icon.
5
In the Security History window, under Protect my Mac, click Quarantine.
6
In the quarantined items list, select the item that you want to view.
7
Click the Actions icon on the top-left corner, and then click one of the following:
■ Repair to rescan the file in order to remove the threat.
■ Restore (not recommended) to take a file that may introduce vulnerabilities out of
quarantine and return it to its original location.
■ Delete to remove the file from Quarantine and from your Mac.
8
Click Done.
Run LiveUpdate to keep Norton up to date on Mac
By default, Norton downloads and installs the latest definition and program updates regularly
from Symantec servers to help protect your computer from new threats. If you have been
offline or turned off Automatic LiveUpdate, you can run LiveUpdate at any time.
Note: Some program updates may require that you restart your computer after you install them.
15Understanding and responding to threats
Run LiveUpdate to keep Norton up to date on Mac

Run LiveUpdate
1
Start Norton.
If you see the My Norton window, next to Device Security, click Open.
2
In the Norton main window, click LiveUpdate.
3
Click View Summary to view the list of updates that were downloaded and installed on
your Mac.
Run LiveUpdate from the My Norton window
1
Start Norton.
2
In the My Norton main window, under Device Security, click LIVEUPDATE.
3
Click View Summary to view the list of updates that were downloaded and installed on
your Mac.
16Understanding and responding to threats
Run LiveUpdate to keep Norton up to date on Mac

Managing your security
This chapter includes the following topics:
■ View or customize tasks that Norton performs to protect your Mac
■ View or customize network activities that Norton monitors on your Mac
View or customize tasks that Norton performs to
protect your Mac
Norton lets you view a range of tasks it performs to help protect you, including scans run, alerts
sent, items quarantined, applications blocked, or attempts detected to access your network.
View or customize tasks that Norton performs to protect your Mac
1
Start Norton.
If you see the My Norton window, next to Device Security, click Open.
2
In the Norton main window, click Advanced or Settings.
3
On the left pane, click Activity.
4
In the Security History row, click the view icon.
5
In the Security History window, select a category to view activities performed.
6
View the recent activities and you can perform the following actions that are available for
the selected event:
■ Click
to download the report as a text file in your Mac disk.
4
Chapter

■ Click
to remove all the recorded events.
■ Click
to filter the recorded events based on your requirement.
■ Click
to print the report.
■ Click
to view additional information about the selected event.
■ Click
to perform the actions that are available for the selected event. The options in the
Action menu vary depending on the event that you selected from the list.
■ Click
to customize the options that need to be displayed for each category. In the Security
History View Options window, set the following options as needed:
■ Show host names instead of IP addresses
■ Show high severity events in a different color
18Managing your security
View or customize tasks that Norton performs to protect your Mac

■ In the Columns drop-down menu, you can select the log category for which you
want to change the viewing options. When you select a category, the types of
details that can be displayed are shown. You can select the details that you want
to view in the Security History window.
More Information
◆
See “Run Norton scans to check for threats on Mac” on page 21.■
■ See “Repair, restore, or delete files on your Mac that Norton quarantined” on page 14.
View or customize network activities that Norton
monitors on your Mac
Norton lets you view network activities it monitors including incoming and outgoing connections
and applications run on open network ports.
View or customize network connection activities
1
Start Norton.
If you see the My Norton window, next to Device Security, click Open.
2
In the Norton main window, click Advanced or Settings.
3
On the left pane, click Activity.
4
In the Network Activity row, click the view icon.
5
In the Network Activity window, select an application, service, or port to view the details
of the current network connections.
6
View the recent network connections activities and you can perform the following actions
that are available for the selected category:
■ Click
to download the report as a text file in your Mac disk.
■ Click
to print the report.
■ Click
19Managing your security
View or customize network activities that Norton monitors on your Mac

to view additional information about the selected event.
■ Click
to perform the actions that are available for the selected event. The options in the
Action menu vary depending on the event that you selected from the list.
■ Click
to customize the options that need to be displayed for each category. In the Network
Activity View Options window, set the following options as needed:
■ Show host names instead of IP addresses
■ Under the Columns section, set the options that you want to view for the
connections.
More Information
◆
■ See “ Get started with Norton for Mac” on page 6.
20Managing your security
View or customize network activities that Norton monitors on your Mac

Scanning your Mac
This chapter includes the following topics:
■ Run Norton scans to check for threats on Mac
■ Change Norton Automatic Scans settings on Mac
■ Schedule Norton scans on Mac
■ Set Norton to scan your Mac while you’re away
Run Norton scans to check for threats on Mac
Norton Automatic Scans updates virus definitions and scans your computer regularly for a
range of threats. If you disable Automatic Scans, have been offline, or suspect that you have
a virus, you can manually run the following:
■ Quick Scan to analyze areas of your computer that are most vulnerable to threats.
■ Full Scan to analyze your entire system including less vulnerable applications, files, and
running processes than those checked during a Quick Scan.
■ File Scan to analyze individual files or folders if you suspect that they are at risk.
Run a Quick Scan, Full Scan, or File scan
1
Start Norton.
If you see the My Norton window, next to Device Security, click Open.
2
In the Norton main window, click Scans.
3
On the left pane, click the scan that you want to run:
■ Quick Scan > Start a Quick Scan
■ Full Scan > Start a Full Scan
■ File Scan > Select a File
5
Chapter

Navigate to the folder or file and then click Scan.
Run scans from the command line
Your Norton product lets you perform multiple scans from the command line interface. The
Norton Scanner feature in the Norton product provides this power user feature. Symantec
recommends that you use this feature only if you are an advanced user.
You can launch the command line interface by navigating to Finder > Applications > Utilities
> Terminal.
Run a Quick Scan
◆
In the command line, type /usr/bin/nortonscanner quickscan.
Run a full system scan
◆
In the command line, type /usr/bin/nortonscanner systemscan.
Scan a specific file
◆
In the command line, type /usr/bin/nortonscanner –a <file path>.
Scan a compressed file
◆
In the command line, type /usr/bin/nortonscanner –c <file path>.
Scan the Quarantine
◆
In the command line, type /usr/bin/nortonscanner quarantine.
Using the Scan Summary window, you can view the summary of the scan that your Norton
product last performed. Your Norton product automatically takes appropriate action on any
infected file that it detects during the scan. You can view the details of the virus scans in the
Security History window.
Note: If your Norton product cannot repair an infected file, the file is quarantined. This way,
your Norton product prevents the infection from spreading and infecting other files in your Mac.
You can find the quarantined item under the Quarantine category in the Security History
window.
You can use the Done option to close the Scan Results window. For potentially unwanted
applications, Delete button is enabled. You can use the Delete button to remove the application.
Your Norton product displays the Virus Scan Complete window which indicates that the
infected files are repaired, and the files are safe to use. You can use the Security History
option in the Activity section of the Advanced window to view the details of the repaired files.
You can also view the detected viruses and the action that was taken against the virus to
protect your Mac.
22Scanning your Mac
Run Norton scans to check for threats on Mac

Change Norton Automatic Scans settings on Mac
Norton Automatic Scans maximizes your security by regularly updating virus definitions,
scanning your computer, and monitoring incoming and outgoing traffic. Default settings are
optimal for most users, but you can customize options to include or exclude files from Automatic
Scans or temporarily turn off the feature.
Change Automatic Scans options
1
Start Norton.
If you see the My Norton window, next to Device Security, click Open.
2
In the Norton main window, click Advanced or Settings.
3
On the left pane, click Protect My Mac.
4
In the Automatic Scans row, click the settings icon to change any of the following:
■ Scan everything
■ Scan only these folders / Don’t scan these folders
Click +, then browse to the folders that you want to include or exclude from Automatic
scans
■ Scan files in compressed archives including .zip or .rar formats.
■ Scan files located on external drives when accessed
Schedule Norton scans on Mac
After you install Norton on your Mac, it enables Automatic Scans to update virus definitions
and scan your computer regularly for a range of threats. You may prefer to schedule scans at
specific times.
Note: Scheduled Scans settings do not change when a different user is on your Mac and
scans continue to run at scheduled times.
Schedule Norton scans
1
Start Norton.
If you see the My Norton window, next to Device Security, click Open.
2
In the Norton product main window, click Advanced or Settings.
3
On the left pane, click Protect my Mac.
4
In the Scheduled Scans row, make sure the switch is on.
If the switch is off, you won’t be able to run or configure scheduled scans.
23Scanning your Mac
Change Norton Automatic Scans settings on Mac

5
Click the settings icon.
6
In the Scheduled Scans window, set your options for what and when to scan.
7
Click Save.
Set Norton to scan your Mac while you’re away
When you install Norton, the Idle Scans feature is set to detect when you are using your Mac
so that Norton does not run scans that could impact your computer performance. Default
settings are optimal for most users, but you can customize settings to scan your entire computer
or specific files and folders only. Though not recommended, you can even turn Idle Scans off.
You see an Idle Scan Report window which indicates that your Norton product detected one
or more infected files during idle scan. You can use the View Log option to view the details
of the infected files in the Security History window
Customize Idle Scans settings
1
Start Norton.
If you see the My Norton window, next to Device Security, click Open.
2
In the Norton product main window, click Advanced or Settings.
3
On the left pane, click Protect my Mac.
4
In the Idle Scans row, make sure the switch is on.
If the switch is off, your computer performance could be impacted when you are working.
5
In the Idle Scans window, customize your scan settings:
■ What to Scan to scan your entire system, your startup disk, or all user folders
■ Scan files in compressed archives (Recommended) to scan compressed files like
.zip files.
■ Show Idle Scans Results to store a record of scan results.
■ Reset to Defaults, to revert any changes you made back to the recommended defaults.
More Information
◆
■ See “Change Norton Automatic Scans settings on Mac” on page 23.
24Scanning your Mac
Set Norton to scan your Mac while you’re away

Keeping secure on the
Internet
This chapter includes the following topics:
■ Vulnerability Protection
■ Set Norton Firewall to block malicious websites from accessing your Mac
■ Turn off or turn on Vulnerability Protection
■ Exclude or include attack signatures on Mac
■ Enable or disable notifications for blocked attack signatures on Mac
■ Firewall settings for Mac
■ Firewall rule for IP addresses on Mac
■ Configure firewall rules for an IP address on Mac
■ Modify firewall rules for an IP address on Mac
■ Remove firewall rule for an IP address on Mac
■ Advanced protection for Mac
■ Disable or enable advanced protection features on Mac
■ Configure Norton DeepSight Community Download on Mac
■ Configure AutoBlock settings on Mac
■ Configure Signatures settings on Mac
■ Upgrade to the latest Norton version to better protect your Mac
6
Chapter

■ Help Norton Community Watch identify potential new threats on Mac
■ Send reports to Symantec if Norton encounters an error on Mac
Vulnerability Protection
Vulnerability Protection feature helps you in detecting and preventing Intrusions through the
Internet. Vulnerability Protection provides information about the susceptibility of the programs
that may be on your Mac against malicious attacks. It also provides information about the
known attacks.
Vulnerabilities are flaws in your programs or your operating system that can create weaknesses
in the overall security of your Mac. Improper Mac configurations or security configurations also
create vulnerabilities. External attackers exploit these vulnerabilities and perform malicious
actions on your Mac. Examples of such malicious attacks are active desktop monitoring,
keylogging, and hacking. Such attacks can slow down the performance of your Mac, cause
program failure, or expose your personal data and confidential information to the cybercriminals.
Your Norton product provides the signature-based solutions to protect your Mac from the most
common Internet attacks. Attack signatures contain the information that identifies an attacker's
attempt to exploit a known vulnerability in your operating system or your Mac programs. The
Intrusion Prevention feature of your Norton product uses an extensive list of attack signatures
to detect and block suspicious network activity.
Set Norton Firewall to block malicious websites from
accessing your Mac
A few malicious websites may attempt to gain unauthorized access to your device information
when you install and open any freeware or shareware applications. Malicious websites detect
and exploit vulnerabilities to download malware such as crypto mining malware that can expose
your device information to cybercriminals.
With URL Monitoring turned on, Norton monitors all applications that are installed on your
computer and block the malicious websites from accessing your device. Norton alerts you
when it blocks a malicious website and you can view the information about the attack using
the Security History window.
Note: URL Monitoring does not monitor the browser applications. To protect your browser
application from malicious websites, you need to add Norton browser extensions. For more
information, see See “Add Norton browser extensions to surf and shop more securely on Mac”
on page 46.
26Keeping secure on the Internet
Vulnerability Protection

Turn on URL Monitoring to block malicious websites
By default, URL Monitoring is turned on. Keep URL Monitoring turned on to ensure protection
against malicious websites.
1
Start Norton.
If you see the My Norton window, next to Device Security, click Open.
2
In the Norton main window, click Advanced or Settings.
3
On the left pane, click Firewall, and make sure the Vulnerability Protection switch on.
4
In the Vulnerability Protection row, click the settings icon.
5
In the Vulnerability Protection window, click the URL Monitoring tab.
6
Click the On option, if it is turned off.
Exclude a URL or domain from monitoring
Vulnerability Protection uses an extensive list of attack signatures to detect and block suspicious
websites. In some cases, benign websites may be identified as suspicious, because it has a
similar attack signature. If you receive notifications about a possible attack, and you know that
the website or domain that triggers the notification is safe, you can exclude it from monitoring.
1
Start Norton.
If you see the My Norton window, next to Device Security, click Open.
2
In the Norton main window, click Advanced or Settings.
3
On the left pane, click Firewall, and make sure the Vulnerability Protection switch on.
4
In the Vulnerability Protection row, click the settings icon.
5
In the Vulnerability Protection window, click the URL Monitoring tab.
6
Click the Add button and enter the URL or the domain name that you want to exclude
from monitoring.
7
Click Save.
8
If you want to edit or remove a URL or domain, do the following:
■ Select a URL or domain from the list and click the Edit button. Modify the URL or the
domain name and click Save.
■ Select a URL or domain that you want to remove and click the Remove button.
View information about the blocked website
1
Start Norton.
If you see the My Norton window, next to Device Security, click Open.
2
In the Norton main window, click Advanced or Settings.
27Keeping secure on the Internet
Set Norton Firewall to block malicious websites from accessing your Mac

3
On the left pane, click Activity.
4
In the Security History row, click the view icon.
5
In the Security History window, under the Firewall category, click Vulnerability
Protection.
6
On the right pane, double click on the attack signature to know more about the blocked
website.
7
In the Vulnerability blocked window, click Learn more to know more about the attack
signature.
Turn off or turn on Vulnerability Protection
You can choose whether you want to protect your Mac from the threats that can affect your
Mac vulnerabilities.
By default, the Vulnerability Protection option is turned on. Symantec recommends that you
keep the Vulnerability Protection option turned on to protect your Mac from any malicious
attacks.
Turn off or turn on Vulnerability Protection
1
Start Norton.
If you see the My Norton window, next to Device Security, click Open.
2
In the Norton product main window, click Advanced.
3
On the left pane, click Firewall.
4
In the Vulnerability Protection row, move the switch to off or on.
Exclude or include attack signatures on Mac
Your Norton product performs scans by comparing the signature of the files against the known
attack signatures to identify threats on your Mac. An attack signature is used to identify an
attacker's attempt to exploit a known operating system or application vulnerability.
You can choose whether you want to protect your Mac from all the attack signatures or only
from the selected signatures. In some cases, benign network activity can appear to be similar
to an attack signature. You might receive repeated notifications about possible attacks. If you
know that the attacks that trigger these notifications are safe, you can create an exclusion list
for the signature that matches the benign activity.
If you want protection against vulnerabilities, but you do not want to receive notifications about
blocked attacks, you can stop Vulnerability Protection from displaying notifications. Unless
28Keeping secure on the Internet
Turn off or turn on Vulnerability Protection

you have a good reason to disable a signature, you should leave the signatures turned on. If
you disable a signature, your computer may be vulnerable to attack.
Enable or disable attack signatures
1
Start Norton.
If you see the My Norton window, next to Device Security, click Open.
2
In the Norton product main window, click Advanced or Settings.
3
On the left pane, click Firewall.
4
In the Vulnerability Protection row, click the settings icon.
5
In the Vulnerability Protection window, click the Signatures tab.
6
In the Signatures list, select a signature, and do one of the following:
■ To disable the detection of the attack signature, uncheck Enable this signature
■ To enable the detection of the attack signature, check Enable this signature
7
Click Done.
Enable or disable notifications for blocked attack
signatures on Mac
You can choose whether you want to receive notifications when Vulnerability Protection blocks
suspected attacks.
The notification message lets you do the following:
■ To view the details of the blocked attack.
■ To report a wrongly detected attack.
All of the Vulnerability Protection activities are recorded in the Security History window. The
entries include information about the unauthorized accesses attempts and other details.
You can enable or disable notification for all blocked attacks or for individual attack signatures.
Enable or disable notifications for all blocked attacks
1
Start Norton.
If you see the My Norton window, next to Device Security, click Open.
2
In the Norton product main window, click Advanced or Settings.
3
On the left pane, click Firewall.
4
In the Vulnerability Protection row, click the settings icon.
5
In the Vulnerability Protection window, click the Advanced tab.
29Keeping secure on the Internet
Enable or disable notifications for blocked attack signatures on Mac

6
In the Advanced tab, do one of the following:
■ To disable the notifications for all blocked attacks, deselect Notify me when
Vulnerability Protection automatically blocks an attack.
■ To enable the notifications for all blocked attacks, select Notify me when Vulnerability
Protection automatically blocks an attack.
7
Click Done.
Enable or disable notifications for individual attack signatures
1
Start Norton.
If you see the My Norton window, next to Device Security, click Open.
2
In the Norton product main window, click Advanced or Settings.
3
On the left pane, click Firewall.
4
In the Vulnerability Protection row, click the settings icon.
5
In the Vulnerability Protection window, click the Signatures tab.
6
In the Signature list, do one of the following:
■ To disable the notifications, deselect Show notifications for this signature.
■ To enable the notifications, select Show notifications for this signature.
7
Click Done.
Firewall settings for Mac
Firewall settings let you customize how firewall should monitor and respond to the inbound
and the outbound network communications. Firewall settings contain the access settings for
the applications, services, and ports on your Mac. They also contain access settings for
connections to or from the other computers in the network to which your Mac is connected.
You can use the Firewall window to customize the following firewall settings:
30Keeping secure on the Internet
Firewall settings for Mac

Lets you configure firewall rules for the applications that run on your Mac to
connect to the Internet.
The Application Blocking settings determine whether to allow or deny an
application, such as a web browser or iTunes, from connecting to the Internet.
Application Blocking settings are not specific to a particular network location.
The Application Blocking settings do not change when you change to a different
network location.
You can use the Configure option under Application Blocking to set Internet
access for applications on your Mac.
Note: Whenever an overlap exists in the settings between Connection Blocking
and Application Blocking, the Connection Blocking settings take precedence
over the Application Blocking settings.
Application Blocking
Lets you allow or block the applications, ports, services, and IP addresses that:
■ Connect to your Mac.
■ Connect to a network.
The Connection Blocking settings determine whether to allow or deny the
incoming or the outgoing connections that use a specific service, application,
or a port. You can also configure firewall to allow or block a specific IP address
on the network.
Connection blocking settings apply only to a particular location.
You can use the settings icon in the Connection Blocking row to set
connections for applications and services on your Mac.
Connection Blocking
Helps you in detecting and preventing Intrusions through the Internet.
Vulnerability Protection monitors all the incoming and the outgoing traffic on
your Mac and blocks any unauthorized access.
It provides information about the susceptibility of the programs that may be on
your Mac against malicious attacks. It also provides information about the known
attacks. You can manage the list of signatures for Vulnerability Protection.
Vulnerability
Protection
Lets you configure the firewall settings based on the network location to which
your Mac is connected.
The firewall settings that you configure contain the connection blocking settings
for the application and services that run on your Mac. When you connect your
portable Mac to a new network location, your Norton product prompts you to
select a new firewall setting for the network location.
Location Awareness
31Keeping secure on the Internet
Firewall settings for Mac

Lets you access and configure the Norton DeepSight Community Download.
This feature lets you obtain the updated list of IP addresses that Symantec
identifies as attackers. You can enable the Norton DeepSight Community
Download feature to obtain the updated list of IP addresses from Symantec
servers.
DeepSight
Firewall rule for IP addresses on Mac
You can use the Connection Blocking window to configure the firewall for zones in the network
to which your Mac is connected. You can configure the zone access settings to specify IP
addresses to which you want to allow or block connections.
The Trust Zone in the View pane shows the IP addresses to or from which you allowed access
attempts for a network location. The Block Zone in the View pane shows the IP address to
or from which you blocked access attempts of a network location.
You can perform the following activities for a zone from the Connection Blocking window:
■ Configure the access settings for an IP address
■ Edit the access settings for an IP address
■ Remove the access settings for an IP address
Configure firewall rules for an IP address on Mac
You can specify the firewall rules of the IP address that is specific to a network location setting.
The Trust Zone in the View pane shows the IP addresses to or from which you allowed access
attempts for a network location. The Block Zone in the View pane shows the IP addresses
to or from which you blocked access attempts of a network location.
Configure firewall rules for an IP address
1
Start Norton.
If you see the My Norton window, next to Device Security, click Open.
2
In the Norton product main window, click Advanced or Settings.
3
On the left pane, click Firewall.
4
In the Connection Blocking row, click the settings icon.
5
In the Connection Blocking window, in the Editing settings menu, select the network
location.
6
In the View menu, click Zones.
32Keeping secure on the Internet
Firewall rule for IP addresses on Mac

7
Click Add IP address.
You can also use the + sign next to the Block Zone or Trust Zone row to specify access
settings for the IP address.
8
In the Edit address window, select the default access setting option. Your options are:
Lets you allow the connections to or from all
computers that exist on your network.
Allow
Lets you block the connections to or from the
computer with the IP address that you specify.
Block
9
In the address menu, select an option to specify the IP addresses of computers to which
you want to apply the access settings. Your options are:
Lets you allow or block connections to or from all
computers on your network.
All computers on my current network
Lets you allow or block connections to or from
the computer with the IP address that you specify.
A single computer
Lets you allow or block connections to or from
computers with the base address that you
specify.
All IP addresses beginning with
Lets you allow or block connections to or from
computers on a local network.
All IP addresses on a network
10
Click Logging and notification settings to configure Norton product to maintain records
and notify you about access attempts.
11
Click Save.
Modify firewall rules for an IP address on Mac
You can edit the firewall rules of IP address, which is specific to a network location setting.
Modify firewall rules for an IP address
1
Start Norton.
If you see the My Norton window, next to Device Security, click Open.
2
In the Norton product main window, click Advanced or Settings.
3
On the left pane, click Firewall.
4
In the Connection Blocking row, click the settings icon.
33Keeping secure on the Internet
Modify firewall rules for an IP address on Mac

5
In the Connection Blocking window, in the Editing Settings menu, select the Connection
Blocking setting for which you want to change the settings of an IP address.
6
In the View menu, click Zones and select a row that contains the access settings for an
IP address that you want to modify.
7
Click Edit.
8
In the Edit address window, make the necessary changes.
9
Click Save.
Remove firewall rule for an IP address on Mac
You can remove the firewall rule for an IP address, which is specific to a network location.
Remove firewall rule for an IP address
1
Start Norton.
If you see the My Norton window, next to Device Security, click Open.
2
In the Norton product main window, click Advanced or Settings.
3
On the left pane, click Firewall.
4
In the Connection Blocking row, click the settings icon.
5
In the Connection Blocking window, in the Editing Settings menu, select a Connection
Blocking setting.
6
In the View menu, click Zones.
7
In the View pane, select the row that contains the access settings of an IP address and
do one of the following:
■ Click Remove, and in the confirmation window, click Remove again.
■ Click the - option that appears next to the IP address that you want to remove, and in
the confirmation window, click Remove again.
Advanced protection for Mac
The Advanced window lets you configure the advanced protection features for your Norton
product.
The following are the different advanced protection features:
Lets you configure your Norton product to
automatically obtain the updated list of IP addresses
of computers that Symantec identifies as attackers.
Norton DeepSight Community Download
34Keeping secure on the Internet
Remove firewall rule for an IP address on Mac

Lets you configure your Norton product to scan all
of the network traffic that enters and exits your Mac
and compare this information against a set of attack
signatures.
The attack signatures contain the information that
identifies an attacker's attempt to exploit a known
operating system or program vulnerability.
Vulnerability Protection
Disable or enable advanced protection features on
Mac
The Advanced window lets you disable or enable the following advanced protection features
of your Norton product:
■ Norton DeepSight Community Download
■ Vulnerability Protection
By default, the advanced protection features are enabled. Symantec recommends that you
do not disable any of the advanced firewall features.
Disable or enable Norton DeepSight Community Download
1
Start Norton.
If you see the My Norton window, next to Device Security, click Open.
2
In the Norton product main window, click Advanced or Settings.
3
On the left pane, click Firewall.
4
In the DeepSight row, click the settings icon.
5
In the Norton DeepSight Settings window, on the Downloads tab, do one of the following:
■ To disable Norton DeepSight Community Download, select Off.
■ To enable Norton DeepSight Community Download, select On.
6
Click Done.
Disable or enable Vulnerability Protection
1
Start Norton.
If you see the My Norton window, next to Device Security, click Open.
2
In the Norton product main window, click Advanced or Settings.
3
On the left pane, click Firewall.
4
In the Vulnerability Protection row, move the switch to off or on.
35Keeping secure on the Internet
Disable or enable advanced protection features on Mac

Configure Norton DeepSight Community Download
on Mac
The Norton DeepSight Community Download feature lets you obtain the updated list of IP
addresses that Symantec identifies as attackers.
You can turn on the Norton DeepSight Community Download feature to obtain the updated
list of IP addresses from Symantec servers.
You can turn on or turn off the Norton DeepSight Community Download feature in the
Advanced window to allow or deny the information to be downloaded from Symantec servers.
Configure Norton DeepSight Community Download
1
Start Norton.
If you see the My Norton window, next to Device Security, click Open.
2
In the Norton product main window, click Advanced or Settings.
3
On the left pane, click Firewall.
4
In the DeepSight row, click the settings icon.
The Norton DeepSight Settings window displays a list of IP addresses that Symantec
identifies as attackers.
5
On the Downloads tab, select the required option to set connections for all of the IP
addresses in the list.
Your options are:
Lets you block the incoming and the outgoing
connections from all the IP addresses in the list.
Block all connections
Lets you block only the incoming connections
from the IP addresses in the list.
Block only incoming connections
6
Click Done.
Configure AutoBlock settings on Mac
You can use the AutoBlock tab in the Vulnerability Protection window to automatically block
the IP addresses of computers that Symantec identifies as attackers. When you turn on the
AutoBlock option, your Norton product adds the IP addresses of the attackers to the
Addresses currently blocked by AutoBlock list. You can use the Addresses should remain
in the list for menu to specify a time period for which your Norton product must block any
connections from the attacker’s IP address.
36Keeping secure on the Internet
Configure Norton DeepSight Community Download on Mac

You can remove an IP address from the Addresses currently blocked by AutoBlock list
using the Remove option.
You can also use the Excluded addresses option to create exceptions for IP addresses that
you trust. Your Norton product allows connections from an excluded address and does not
include the address in the Addresses currently blocked by AutoBlock list.
Configure AutoBlock settings
1
Start Norton.
If you see the My Norton window, next to Device Security, click Open.
2
In the Norton product main window, click Advanced or Settings.
3
On the left pane, click Firewall.
4
In the Vulnerability Protection row, click the settings icon.
5
In the Vulnerability Protection window, select the AutoBlock tab.
6
Click the On option to turn on AutoBlock.
7
View the list of IP addresses blocked by the Vulnerability Protection feature in the
Addresses currently blocked by AutoBlock list.
8
Set the time period for which your Norton product must block any connections in the
Addresses should remain in the list for list.
The default value is 30 minutes.
9
Click Done.
Configure Signatures settings on Mac
Vulnerability Protection uses a frequently updated list of signatures to detect known attacks.
You can view the list of signatures in the Signatures list.
You can receive alerts when an access attempt that matches a signature occurs using the
Enabled option and the Notify option next to a signature in the Signatures list. By default,
all the signatures are enabled and selected for notification.
You must not disable any signatures in the Signatures list. If you disable a signature,
Vulnerability Protection feature cannot protect you from the threat that is related to the
signature.
You can also enable the Notify me when Vulnerability Protection automatically blocks
an attack alerts to receive an alert whenever Vulnerability Protection blocks an attack.
37Keeping secure on the Internet
Configure Signatures settings on Mac

Configure the Signature settings
1
Start Norton.
If you see the My Norton window, next to Device Security, click Open.
2
In the Norton product main window, click Advanced or Settings.
3
On the left pane, click Firewall.
4
In the Vulnerability Protection row, click the settings icon.
5
In the Vulnerability Protection window, select the Signatures tab.
6
Under the Signatures list, disable or enable the required options for any signature.
7
Click Done.
Upgrade to the latest Norton version to better protect
your Mac
Upgrading lets you download and install an entirely new version of Norton device security and
assures that you have the most current security features on your Mac. You need to be online
to upgrade.
Note: Upgrading to the latest Norton version is different than updating threat definitions through
LiveUpdate. You can only upgrade if a new version of Norton device security is available.
However, you can run LiveUpdate anytime to get the latest threat definitions and minor
application enhancements.
Upgrade if you receive a notification or alert
To receive an upgrade alert or notification, the Automatic Upgrades option needs to be enabled.
By default, the Automatic Upgrades option is enabled.
1
On the upgrade alert, click Upgrade.
2
If your subscription is current:
■ In the Free Protection Upgrade window, click Upgrade Now.
■ When prompted, type your administrator account password, and then click Install
Helper.
■ Click Restart to complete the upgrade process.
3
If your subscription has expired:
■ To uninstall your expired version, click Agree & Install, and then click Continue.
■ Click Restart to uninstall.
38Keeping secure on the Internet
Upgrade to the latest Norton version to better protect your Mac

■ When your computer restarts, you can upgrade to the latest Norton version or trial
version. Read the Norton license agreement, and click Agree & Install.
■ Click Restart to complete the upgrade process.
Upgrade if you see Upgrade Available in the Mac menu bar
1
On the Mac menu bar, click the Symantec icon.
2
Click Upgrade Available.
3
If your subscription is current:
■ In the Free Protection Upgrade window, click Upgrade Now.
■ When prompted, type your administrator account password, and then click Install
Helper.
■ Click Restart to complete the upgrade process.
4
If your subscription has expired:
■ To uninstall your expired version, click Agree & Install, and then click Continue.
■ Click Restart to uninstall.
■ When your computer restarts, you can upgrade to the latest Norton version or trial
version. Read the Norton license agreement, and click Agree & Install.
■ Click Restart to complete the upgrade process.
Upgrade if you see Upgrade Available in the Norton main window Help drop down
1
Start Norton.
If you see the My Norton window, next to Device Security, click Open.
2
In the Norton product main window, click Help.
3
In the Help drop-down menu, click Upgrade Available.
4
If your subscription is current:
■ In the Free Protection Upgrade window, click Upgrade Now.
■ When prompted, type your administrator account password, and then click Install
Helper.
■ Click Restart to complete the upgrade process.
5
If your subscription has expired:
■ To uninstall your expired version, click Agree & Install, and then click Continue.
■ Click Restart to complete the uninstallation process.
39Keeping secure on the Internet
Upgrade to the latest Norton version to better protect your Mac

■ When your computer restarts, you can upgrade to the latest Norton version or trial
version. Read the Norton license agreement, and click Agree & Install.
■ Click Restart to complete the upgrade process.
Disable or enable Automatic Upgrades
1
Start Norton.
If you see the My Norton window, next to Device Security, click Open.
2
In the Norton main window, click Advanced or Settings.
3
On the left pane, click Product Settings.
4
In the Automatic Upgrades row, move the switch to off or on.
Help Norton Community Watch identify potential new
threats on Mac
Norton Community Watch allows Norton security product users to help improve the identification
and reduce the time to deliver protection against new security threats. The program collects
selected security and application data and submits the data to Symantec for analysis to identify
new threats and their sources. The program helps build a better, stronger security product by
analyzing the data sent from the user.
Read the Norton Privacy policy for more information on how Norton accesses, collects, and
processes data for specific products.
Turn off or turn on Norton Community Watch
1
Start Norton.
If you see the My Norton window, next to Device Security, click Open.
2
In the Norton main window, click Advanced or Settings.
3
On the left pane, click Product Settings.
4
In the Norton Community Watch row, move the switch to off or on.
Send reports to Symantec if Norton encounters an
error on Mac
Norton Error Management documents issues which are encountered with the Norton Product.
In such cases the user can choose to report errors to Symantec.
40Keeping secure on the Internet
Help Norton Community Watch identify potential new threats on Mac

Turn off or turn on Error Management
1
Start Norton.
If you see the My Norton window, next to Device Security, click Open.
2
In the Norton product main window, click Advanced or Settings.
3
On the left pane, click Product Settings.
4
In the Error Management row, move the switch to off or on.
5
In the Error Management window, click the settings icon to enable Norton to send detailed
data about an error.
6
In the Error Management window, click What’s collected? to learn more about the data
Symantec collects.
See the Norton Privacy policy for more information on how Norton accesses, collects,
and processes data for specific products.
41Keeping secure on the Internet
Send reports to Symantec if Norton encounters an error on Mac

Keeping your Mac tuned up
This chapter includes the following topics:
■ Run Norton Clean to remove files that can slow down your Mac
■ Schedule or customize Norton Clean scans to help improve your Mac’s performance
Run Norton Clean to remove files that can slow down
your Mac
Junk files, including temporary, installation, or even duplicate files from your email or photo
albums, can impact computer performance. Norton Clean removes many types of junk files
that can slow down your Mac.
Norton Clean does not scan connected devices and only runs on Mac OSX 10.10.5 or later.
By default, Norton Clean moves junk files to your trash, but does not delete them. To set Norton
Clean to automatically delete junk files, see See “Schedule or customize Norton Clean scans
to help improve your Mac’s performance ” on page 43.
Run Norton Clean to remove junk files
1
Start Norton.
If you see the My Norton window, next to Device Security, click Open.
2
In the Norton main window, click Clean.
3
Click Run now or Start.
If Norton Clean prompts you to open the Photos and iTunes apps, click Open.
7
Chapter

4
In the Overview window, in the Similar row and Duplicate rows, click Review, select the
files that you want to remove, and then click Done.
Similar means two files appear to be identical, although they may have slight differences
like different file names. Duplicate means the files are identical.
5
Click Clean to move the files that you selected to the trash.
In the Clean Complete window, you can see the results of the scan.
Schedule or customize Norton Clean scans to help
improve your Mac’s performance
Schedule or customize Norton Clean
1
Start Norton.
If you see the My Norton window, next to Device Security, click Open.
2
In the Norton main window, click Clean.
3
In the Clean window, next to the Run Now or Start button, click the settings icon.
4
In the pop up, schedule scans or configure settings by clicking the following tabs:
■ General
■ Next to Search for, select the types of files that you want Norton Clean to remove.
For best results, leave all defaults checked.
■ Next to Schedule Norton Clean, set how often you want scheduled scans to run.
■ Select Run Norton Clean when my disk space is low to remove files automatically
when your hard drive is getting full.
■ Check either the option to move junk files to the trash or permanently delete them
as soon as Norton Clean runs. If you move files to the trash, you must empty your
trash before files are permanently deleted.
■ Similars and Duplicates
For most users, default settings provide the best results.
■ In the left pane, select General and then:
Select the options to open Photos and iTunes apps automatically if you don’t want
to be asked to open them each time Norton Clean runs.
Select Perform extended search to have Norton Clean scan more than the most
likely locations to find duplicate or similar files.
■ In the left pane, under Exclusions:
Select File types to add or remove file types that you want to exclude from scans.
43Keeping your Mac tuned up
Schedule or customize Norton Clean scans to help improve your Mac’s performance

Select Paths, and then click + to navigate to specific files or folders that you want
to exclude from scans.
■ In the left pane, under Types:
Click on each file type and then select options to change the default settings.
■ Autoselect
■ Click the + icon.
■ In the Add Autoselect rule window, use the drop downs to add rules for files that
you want to either scan or not scan when Norton Clean runs.
44Keeping your Mac tuned up
Schedule or customize Norton Clean scans to help improve your Mac’s performance

Securing your sensitive
data
This chapter includes the following topics:
■ Set Norton to detect fraudulent or phishing websites on Mac
■ Add Norton browser extensions to surf and shop more securely on Mac
Set Norton to detect fraudulent or phishing websites
on Mac
Norton device security includes Safe Web to analyze sites when you browse using Firefox,
Safari, or Chrome. It ranks site security and alerts you if it detects fraudulent or phishing sites.
Safe Web helps protect you from cybercriminals who set up fake sites, such as illegitimate
shopping sites, in order to get you to enter financial or personal information
Enable and configure Safe Web options
Note: You can enable and configure Safe Web options only on Mac OS X 10.9 or earlier
versions.
1
Start Norton.
If you see the My Norton window, next to Device Security, click Open.
2
In the Norton main window, click Advanced or Settings.
3
On the left pane, click Safe Web, and make sure the Safe Web switch on.
4
In the Safe Web row, click the settings icon, and set the following options as needed:
■ Enhance search engine results to display site ratings in search results.
8
Chapter

■ Show a warning when visiting a harmful website.
■ Block harmful websites.
■ Enable Phishing Protection to analyze the security level of the website you visit.
■ Submit full URL when a suspicious website is detected to send the site URL to
Symantec for analysis.
Enable Norton Safe Search as your default search engine
In addition, you can set Norton Home Page as your default home page.
1
Open your browser and click the Safe Web extension icon.
2
In the Safe Web pop-up that appears, click the settings icon.
3
In the Browser Settings page, check Enable Norton Safe Search as your default search
engine.
Add Norton browser extensions to surf and shop more
securely on Mac
After you install Norton on Mac, you are prompted to add browser extensions when you first
open Safari, Firefox, or Chrome. Norton provides you the browser focus feature where the
browser extension alert appears only when you focus the browser. Enable Norton Safe Web,
Norton Safe Search, Norton Home Page, and Norton Password Manager extensions to
maximize your security online.
If you have Mac OS X 10.10.x or later, the Norton standalone browser extensions are available
even after you uninstall your Norton product. If you uninstall your Norton product on Mac OS
X 10.9 or earlier, all the browser extensions pertaining to Safari and Firefox are removed except
for extensions installed on Chrome browser.
Note: Norton Safe Web, Norton Home Page, Norton Safe Search, and Norton Password
Manager standalone extensions are not supported on Mac OS X 10.9 or earlier, and on the
older version of the web browsers. To install the latest Norton browser extensions, upgrade
your Mac operating system and your web browsers to the latest version.
46Securing your sensitive data
Add Norton browser extensions to surf and shop more securely on Mac

Add Norton browser extensions for Mac OS X 10.10 or later
Safari
Safari 12 and above versions on macOS 10.14.4 (Mojave) and above
1
The Norton Safe Web or Norton Safe Web Plus alert appears when you launch Safari
for the first time after you install Norton.
2
In the alert, do one of the following:
■ Click Download to install the Norton Safe Web extensions.
■ Click Remind Me Later to install the Norton Safe Web extensions later.
■ No, Thanks: You can see this option only after you use the Remind Me Later option
thrice. You receive the browser extension alert again that has No, Thanks option
instead of Remind Me Later. Click the No, Thanks option to ignore the alert for the
next 2 weeks.
Note: After 2 weeks, you receive a Fix Now alert, if your default web browser is Safari.
Click Fix Now to install the Norton Safe Web extensions. If you ignore the Fix Now alert,
then you receive the alert again after 6 months, when you open the Safari browser.
For more information, refer Norton Safe Web Plus App extension for Safari.
Firefox
1
When you focus the Firefox browser for the first time after you install Norton, the Firefox
Browser Protection page automatically opens in a new tab, that lets you install the
extensions that include Norton Safe Search, Norton Home Page, Norton Safe Web,
and Norton Password Manager.
Note: Norton Safe Search standalone extension is supported only on the latest version
of the Firefox.
2
You can use the Enable option and follow the on-screen instructions to enable the browser
extensions. Alternatively, you can also use Enable All Norton Extensions option to install
all the browser extensions.
3
If you have not installed any one of the extensions other than Norton Password Manager,
the Firefox browser extension alert appears when you launch Firefox after one week. In
the alert, do one of the following:
■ Click Add, the Firefox Browser Protection page automatically opens in a new tab.
You can use the Enable option and follow the on-screen instructions to enable the
extensions.
47Securing your sensitive data
Add Norton browser extensions to surf and shop more securely on Mac

■ Click Remind Me Later to install the Norton browser extensions later.
■ No, Thanks: You can see this option only after you use the Remind Me Later option
thrice. You receive the browser extension alert again that has No, Thanks option
instead of Remind Me Later. Click the No, Thanks option to ignore the alert for the
next 2 weeks.
Note: After 2 weeks, you receive a Fix Now alert, if your default web browser is Firefox,
and if you do not install the Norton Safe Web extension. Click Fix Now to install the
browser extensions. If you ignore the Fix Now alert, then you receive the Firefox
browser extension alert again after 6 months, when you open the Firefox browser.
Chrome
1
When you open the Chrome browser for the first time after you install Norton, the Chrome
Browser Protection page is launched automatically, that lets you install the extensions
that include Norton Safe Search, Norton Home Page, Norton Safe Web, and Norton
Password Manager.
2
You can use the Click to Add option and follow the on-screen instructions to enable the
browser extensions. Alternatively, you can also use Add All Norton Extensions option
to install all the browser extensions.
3
If you have not installed any one of the extensions other than Norton Password Manager,
the Chrome browser extension alert appears when you launch Chrome after one week.
In the alert, do one of the following:
■ Click Add, to launch the Chrome Browser Protection page automatically. You can
use the Click to Add option and follow the on-screen instructions to enable the
extensions.
■ Click Remind Me Later to install the Norton browser extensions later.
■ No, Thanks: You can see this option only after you use the Remind Me Later option
thrice. You receive the browser extension alert again that has No, Thanks option
instead of Remind Me Later. Click the No, Thanks option to ignore the alert for the
next 2 weeks.
Note: After 2 weeks, you receive a Fix Now alert, if your default web browser is Chrome,
and if you do not install the Norton Safe Web extension. Click Fix Now to install the
browser extensions. If you ignore the Fix Now alert, then you receive the Chrome
browser extension alert again after 6 months, when you open the Chrome browser.
48Securing your sensitive data
Add Norton browser extensions to surf and shop more securely on Mac

Add Norton browser extensions for Mac OS X 10.9 or earlier
Safari
1
When you open the Safari browser for the first time after you install Norton, your Norton
product displays the Safari browser extension alert that lets you install the extension that
include the browser-specific features such as Norton Safe Search, Norton Home Page,
and Norton Safe Web.
2
Do one of the following:
■ Click Add to install the Norton browser extension. The Safari Browser Protection page
automatically opens in a new tab. You can use the Enable Now option and follow the
on-screen instructions to enable the extension.
■ Click Remind Me Later to install the Norton browser extension later.
■ No, Thanks: You can see this option only after you use the Remind Me Later option
thrice. You receive the browser extension alert again that has No, Thanks option
instead of Remind Me Later. Click the No, Thanks option to ignore the alert for the
next 2 weeks.
Note: After 2 weeks, you receive a Fix Now alert, if your default web browser is Safari,
and if you do not install the Norton Safe Web extension. Click Fix Now to install the
browser extensions. If you ignore the Fix Now alert, then you receive the Safari browser
extension alert again after 6 months, when you open the Safari browser.
Firefox
1
When you open the Firefox browser for the first time after you install Norton, your Norton
product displays the Firefox browser extension alert that lets you install the extension that
include the browser-specific features such as Norton Safe Search, Norton Home Page,
and Norton Safe Web.
2
Do one of the following:
■ Click Add, the Firefox browser opens the extensions pop-up in a new tab. Click Add,
the Firefox Browser Protection page automatically opens in a new tab. You can use
the Enable Now option and follow the on-screen instructions to enable the extension.
■ Click Remind Me Later to install the Norton browser extension later.
■ No, Thanks: You can see this option only after you use the Remind Me Later option
thrice. You receive the browser extension alert again that has No, Thanks option
instead of Remind Me Later. Click the No, Thanks option to ignore the alert for the
next 2 weeks.
49Securing your sensitive data
Add Norton browser extensions to surf and shop more securely on Mac

Note: After 2 weeks, you receive a Fix Now alert, if your default web browser is Safari,
and if you do not install the Norton Safe Web extension. Click Fix Now to install the
browser extensions. If you ignore the Fix Now alert, then you receive the Safari browser
extension alert again after 6 months, when you open the Safari browser.
Chrome
1
When you open the Chrome browser for the first time after you install Norton, the Chrome
Browser Protection page is launched automatically, that lets you install the extensions
that include Norton Safe Search, Norton Home Page, and Norton Safe Web.
2
You can use the Click to Add option and follow the on-screen instructions to enable the
browser extensions. Alternatively, you can also use Add All Norton Extensions option
to install all the browser extensions.
3
If you have not installed any one of the extensions, the Chrome browser extension alert
appears when you launch Chrome after one week. In the alert, do one of the following:
■ Click Add, to launch the Chrome Browser Protection page automatically. You can
use the Click to Add option and follow the on-screen instructions to enable the
extensions.
■ Click Remind Me Later to install the Norton browser extensions later.
■ No, Thanks: You can see this option only after you use the Remind Me Later option
thrice. You receive the browser extension alert again that has No, Thanks option
instead of Remind Me Later. Click the No, Thanks option to ignore the alert for the
next 2 weeks.
Note: After 2 weeks, you receive a Fix Now alert, if your default web browser is Chrome,
and if you do not install the Norton Safe Web extension. Click Fix Now to install the
browser extensions. If you ignore the Fix Now alert, then you receive the Chrome
browser extension alert again after 6 months, when you open the Chrome browser.
50Securing your sensitive data
Add Norton browser extensions to surf and shop more securely on Mac

Customizing settings
This chapter includes the following topics:
■ Connection Blocking settings for Mac
■ Configure Connection Blocking settings on Mac
■ Access settings for an application
■ Configure the access settings for an application
■ Access settings for a service
■ Configure the access settings for services
■ Customize the specific access settings for a service
■ Edit the access settings for a service
■ Remove the access settings for a service
■ Configure firewall for an application on Mac
■ Set up firewall rules for an application on Mac
■ Remove the firewall rule for an application on Mac
■ Location Awareness settings for Mac
■ Disable or enable Location Awareness on Mac
■ Export the connection blocking settings for a network location
■ Stop background tasks when you play games or watch movies on Mac
9
Chapter

Connection Blocking settings for Mac
You can configure the Connection Blocking settings for an application, a service, or an IP
address. Based on the Connection Blocking settings, the firewall allows, or blocks the incoming
and the outgoing network connections.
The Connection Blocking settings that you configure are specific to the selected network
location. The settings apply only when your Mac connects to the specified network location.
You can configure the Connection Blocking settings for the following:
Lets you specify access settings for the applications
that run on your Mac.
Applications
Lets you specify access settings for the services
and ports that run on your Mac.
Services/Ports
Lets you specify the IP address to or from which
you want to allow or block connections.
Zones
Lets you view the entire access settings for a firewall
setting that you select.
Whenever the settings overlap, settings at the top
of the list take precedence over the settings in the
bottom of the list.
All, in order of precedence
Configure Connection Blocking settings on Mac
Connection Blocking settings apply to the incoming and the outgoing connections that use a
specific application, service, port, or IP address.
You can use the Connection Blocking window to configure whether an application or a service
that is allowed to connect to the Internet or to the local network. You can select the required
network location from the Editing settings menu and configure the Connection Blocking
settings.
Note: You can configure the Connection Blocking settings only if the Connection Blocking
option is turned on in the Advanced window.
Note: You must have a user account that has administrator privileges to perform this task.
52Customizing settings
Connection Blocking settings for Mac

Configure Connection Blocking settings
1
Start Norton.
If you see the My Norton window, next to Device Security, click Open.
2
In the Norton product main window, click Advanced or Settings.
3
On the left pane, click Firewall.
4
In the Connection Blocking row, click the settings icon.
5
In the Connection Blocking window, in the Editing settings menu, select the network
location for which you want to configure the connection blocking settings.
6
Select an option in the View menu.
The options that appear in the View menu vary depending on the network location that
you select in the Editing settings menu.
Your options are:
Lets you specify the Connection Blocking settings
for the applications that run on your Mac.
Applications
Lets you specify the Connection Blocking settings
for the services and ports that run on your Mac.
Services/Ports
Lets you specify the IP address to or from which
firewall allows or blocks connections.
Zones
Lets you specify the current Connection Blocking
settings for the Applications, services, ports, and
zones in the order of precedence.
All, in order of precedence
7
Select one of the following tabs:
Lets you specify the access settings for the
incoming connections that use an application or
a service that runs on your Mac.
Incoming
Lets you specify the access settings for the
outgoing connections that use an application or
a service that runs on your Mac.
Outgoing
Lets you configure the access settings for
connections to and from the IP addresses that
you specify.
This tab appears only when you select Zones in
the View menu.
Incoming & Outgoing
53Customizing settings
Configure Connection Blocking settings on Mac

8
Use the Action pop-up menu at the bottom of the Connection Blocking window to
specify other connection blocking preferences. Your options are:
Lets you specify the type of access attempts for
which your Norton product must maintain records.
You can also specify the type of access attempts
about which your Norton product must notify you.
Logging and notification settings
Lets you specify the advanced firewall options.Advanced settings
Lets you reset configuration to default level.Reset to defaults
9
Click Done.
Access settings for an application
You can use the Connection Blocking window to specify the access settings of applications
to connect to a network. You can customize the firewall to allow or block network connections
to or from applications like iTunes.
You can also configure the default and specific access settings for an application. The default
access settings apply to all the incoming and the outgoing connections within your network.
The specific access settings let you allow or block connections to specific computers.
You can perform the following activities for an application using the Connection Blocking
window:
■ Configure the access settings
■ Customize the specific access settings
■ Edit the access settings
■ Remove the access settings
Configure the access settings for an application
Your Norton product lets you configure the access settings for the applications that run on
your Mac. Based on the settings that you configure and the network location of your Mac, the
firewall allows or blocks the incoming and the outgoing connections.
When you configure the access settings for an application, the name of the application appears
in the View pane of the Connection Blocking window. You can also view the default access
setting for the selected application under the application name.
54Customizing settings
Access settings for an application

Your Norton product creates the <All other applications> access setting by default. This
access setting includes all applications that run on your Mac.
Configure the access settings for an application
1
Start Norton.
If you see the My Norton window, next to Device Security, click Open.
2
In the Norton product main window, click Advanced or Settings.
3
On the left pane, click Firewall.
4
In the Connection Blocking row, click the settings icon.
5
In the Connection Blocking window, in the Editing settings menu, select the network
location for which you want to configure the access settings.
6
In the View menu, select Applications.
7
Select one of the following tabs:
Lets you specify the access settings for the
incoming connections for the application.
Incoming
Lets you specify the access settings for the
outgoing connections for the application.
Outgoing
8
Click Add application.
9
In the Choose Application dialog, select the required application.
If the application that you want does not appear in the list, click Other to search for the
application.
10
In the menu at the top of the dialog, select one of the following default access setting:
Allows the network connections for the
application.
Allow
Blocks the network connections for the
application.
Block
Sets up the firewall notify you when a program
attempts to access the Internet.
Ask
11
Click Choose.
The name of the application that you have added appears in the View pane in the
Connection Blocking window.
55Customizing settings
Configure the access settings for an application

12
Use the Action drop-down menu at the bottom of the Connection Blocking window to
specify the advanced firewall preferences. Your options are:
Lets you specify the type of access attempts for
which your Norton product must maintain records.
Logging and notification settings
Lets you specify the advanced firewall options.Advanced settings
Lets you reset configuration to default level.Reset to defaults
13
Click Done.
Access settings for a service
You can use the Connection Blocking window to specify access settings for the services
that are running on your Mac. For example, you can customize the access settings for the file
transfer protocol (FTP) service that allows access to the shared folders on your Mac using the
port 21. You can customize the firewall for FTP to allow or block the incoming and the outgoing
connections.
When you add an existing service, your Norton product displays the port through which the
service communicates the incoming and the outgoing connections.
You also can specify default and specific access settings for a service. The default access
setting applies to all connections to or from the computers that use the service. The specific
access settings let you allow or block connections to specific computers.
You can perform the following activities for a service using the Connection Blocking window:
■ Configure the access settings
■ Customize the specific access settings
■ Edit the access settings
■ Remove the access settings
Configure the access settings for services
Your Norton product lets you specify the access settings for the services that run on your Mac.
Based on the access settings that you specify and the current network location of your Mac,
firewall allows or blocks the network connections that use the service.
The access settings that you configure are specific to the selected network location. It applies
to your Mac only when it connects to the network location for which your Connection Blocking
setting is configured.
56Customizing settings
Access settings for a service

When you add a service, the name of the service appears in the View pane of the Connection
Blocking window. In addition, you can view the default access setting for the service under
the service name.
By default, your Norton product creates the <All other services> access setting. This access
setting includes all services that run on your Mac.
Specify access settings for a service
1
Start Norton.
If you see the My Norton window, next to Device Security, click Open.
2
In the Norton product main window, click Advanced or Settings.
3
On the left pane, click Firewall.
4
In the Connection Blocking row, click the settings icon.
5
In the Connection Blocking window, in the Editing settings menu, select the network
location for which you want to configure the access settings.
6
In the View menu, select Services/Ports.
7
Select one of the following tabs:
Lets you specify the access settings for the
incoming connections that use the service.
Incoming
Lets you specify the access settings for the
outgoing connections that use the service.
Outgoing
8
Click Add service.
9
In the New Service dialog that appears, select the default access setting option that you
want to apply for the service. Your options are:
Allows the network connections for the service.Allow
Blocks the network connections for the service.Block
10
Select the required service from the Service name menu.
If the service is not listed in the Service name menu, enter the name of the new service
in the Service name menu. You can also enter a description for the service in the
Description field.
57Customizing settings
Configure the access settings for services

11
Configure the following tabs as required:
Lists the ports in the firewall that the service can
open.
You can use the Add, Edit, and Remove options
only when you add a new service.
You can use these options to add or modify the
port numbers that you add.
Ports
Lists the types of connections that your Norton
product must log.
Logging
Lists the types of connections for which your
Norton product should notify you when it makes
a connection attempt.
You can select whether the firewall must allow
or block the connection attempts that use the
service.
Notifications
12
Click Save.
13
In the Action drop-down menu at the bottom of the Connection Blocking window, specify
the advanced firewall preferences. Your options are:
Lets you specify the type of access attempts for
which you want your Norton product to maintain
records.
You can also specify the type of access attempts
about which you want your Norton product to
notify you.
Logging and notification settings
Lets you specify the advanced firewall options.Advanced settings
Lets you reset configuration to default level.Reset to Defaults
14
Click Done.
Customize the specific access settings for a service
Your Norton product lets you customize the incoming and outgoing network connections
settings for each service on your Mac. You can specify the IP addresses from which you want
to allow or block connection attempts. The specific access settings that you specify appear in
the row under the application name with a minus (-) and plus (+) sign.
58Customizing settings
Customize the specific access settings for a service

Note: You can add any number of specific access settings for a service. For example, you can
add a specific access setting for a service to allow connection from all the computers on your
network. You can also add another specific access setting for the same service to block
connection from a single computer.
Customize the specific access settings for a service
1
Start Norton.
If you see the My Norton window, next to Device Security, click Open.
2
In the Norton product main window, click Advanced or Settings.
3
On the left pane, click Firewall.
4
In the Connection Blocking row, click the settings icon.
5
In the Connection Blocking window, in the Editing settings menu, select the network
location for which you want to specify the specific access settings.
6
In the View menu, click Services/Ports.
7
Select one of the following tabs:
Lets you specify the access settings for the
incoming connections that use the service.
Incoming
Lets you specify the access settings for the
outgoing connections that use the service.
Outgoing
8
In the View pane, click the + sign next to the service name.
9
In the Edit address dialog, select the type of access for the connections. Your options
are:
Lets you allow the connections to or from an IP
address.
Allow
Lets you block the connections to or from an IP
address.
Block
59Customizing settings
Customize the specific access settings for a service

10
Select the one of the following option to customize the specific access settings:
Lets you allow or block connections to or from all
computers on your network.
All computers on my current network
Lets you allow or block connections to or from
the computer with the IP address that you specify.
A single computer
Lets you allow or block connections to or from
computers with the base address that you
specify.
All IP addresses beginning with
Lets you allow or block connections to or from
computers on a local network.
All IP addresses on a network
11
Click Save.
Edit the access settings for a service
You can edit the following access settings for a service:
■ Access settings
■ Specific the access settings
■ Default access setting
Edit the access settings for a service
1
Start Norton.
If you see the My Norton window, next to Device Security, click Open.
2
In the Norton product main window, click Advanced or Settings.
3
On the left pane, click Firewall.
4
In the Connection Blocking row, click the settings icon.
5
In the Connection Blocking window, in the Editing settings menu, select the network
location for which you want to edit the Connection Blocking settings.
6
In the View menu, select Services/Ports.
7
Select one of the following tabs:
Lets you specify the access settings for the
incoming connections that use the service.
Incoming
Lets you specify the access settings for the
outgoing connections that use the service.
Outgoing
60Customizing settings
Edit the access settings for a service

8
In the View pane, select the row that contains the service name, and then click Edit.
9
In the Edit Service dialog, make the changes as required.
10
Click Save.
Edit the specific access settings for a service
1
Start Norton.
If you see the My Norton window, next to Device Security, click Open.
2
In the Norton product main window, click Advanced or Settings.
3
On the left pane, click Firewall.
4
In the Connection Blocking row, click the settings icon.
5
In the Connection Blocking window, in the Editing settings menu, select the network
location for which you want to edit the Connection Blocking settings.
6
In the View menu, select Services/Ports.
7
On the Incoming or the Outgoing tab, select a service for which you want to edit the
specific access settings.
8
In the View pane, select the row that contains the specific access settings for the
application, and then click Edit.
9
In the Edit Service window, make the changes as required.
10
Click Save.
Edit the default access settings for a service
1
Start Norton.
If you see the My Norton window, next to Device Security, click Open.
2
In the Norton product main window, click Advanced or Settings.
3
On the left pane, click Firewall.
4
In the Connection Blocking row, click the settings icon.
5
In the Connection Blocking window, in the Editing settings menu, select the network
location for which you want to edit the Connection Blocking settings.
6
In the View menu, select Services/Ports.
7
On the Incoming or the Outgoing tab, select the row that contains the default access
settings for the service in the View pane, and then click Edit.
61Customizing settings
Edit the access settings for a service

8
In the Default action for <Service Name> window, that appears select one of the following
options:
Allows the network connections for the service.Allow
Blocks the network connections for the service.Block
9
Click Save.
Remove the access settings for a service
You can use the Connection Blocking window to remove the access settings and the specific
access settings that you have configured for a service.
However, you cannot remove the default Connection Blocking setting that appears in the list.
Remove all access settings for a service
1
Start Norton.
If you see the My Norton window, next to Device Security, click Open.
2
In the Norton product main window, click Advanced or Settings.
3
On the left pane, click Firewall.
4
In the Connection Blocking row, click the settings icon.
5
In the Connection Blocking window, in the Editing settings menu, select the network
location for which you want to remove the Connection Blocking settings.
6
In the View menu, select Services/Ports.
7
Select one of the following tabs:
Lets you specify the access settings for the
incoming connections that use the service.
Incoming
Lets you specify the access settings for the
outgoing connections that use the service.
Outgoing
8
Select the required service from the View pane and do one of the following:
■ Click Remove.
■ Click the - sign next to the service name.
9
In the confirmation window, click Remove.
62Customizing settings
Remove the access settings for a service

Remove an individual access setting for a service
1
Start Norton.
If you see the My Norton window, next to Device Security, click Open.
2
In the Norton product main window, click Advanced or Settings.
3
On the left pane, click Firewall.
4
In the Connection Blocking row, click the settings icon.
5
In the Connection Blocking window, in the Editing settings menu, select the network
location for which you want to remove the Connection Blocking settings.
6
In the View menu, select Services/Ports.
7
Select one of the following tabs:
Lets you specify the access settings for the
incoming connections that use the service.
Incoming
Lets you specify the access settings for the
outgoing connections that use the service.
Outgoing
8
In the View pane, select the row that contains the specific access settings for a service
and do one of the following:
■ Click Remove.
■ Click the - sign next to the service name.
9
In the confirmation window, click Remove.
Configure firewall for an application on Mac
The Application Blocking settings let you configure the firewall rules for the different applications
that run on your Mac. Based on these settings, the firewall allows or blocks connections to the
Internet from an application.
Note: You cannot specify the firewall settings for applications based on the network to which
your Mac is connected. The Application Blocking settings remain the same regardless of the
network location. Application Blocking does not let you allow or block connections to a specific
IP address.
When an application for which you have not specified Internet access tries to connect to the
Internet, Norton product prompts you with a notification dialog. You can choose whether you
want the firewall to allow or block the application from accessing the Internet.
63Customizing settings
Configure firewall for an application on Mac

In addition to setting Internet access for applications, you can select the following options for
the application in the Application Blocking window:
Lets you locate an application in the Settings list.Search icon
Lets you add an application and configure the
Internet access manually.
Add application
Lets you remove a selected application from the
Settings list.
Remove
Lets you automatically allow the applications that
are signed by Apple to access the Internet.
Allow applications that are signed by Apple
Lets you configure your Norton product to notify you
whenever a blocked application attempts to access
the Internet.
Notify me when a blocked application tries to
use the Internet
Lets you keep record of the applications that access
the Internet.
This information is viewable in the Security History
window.
Log all applications that use the Internet
Lets you reset configuration to default level.Reset to defaults
Set up firewall rules for an application on Mac
Applications that run on your Mac connect to the Internet to download updates or to send
information about a program. For example, when you open Apple iTunes, it connects to the
Internet to get the latest Store information of iTunes. If you trust the application, you can allow
the application to connect to the Internet.
In some cases, you may want to deny Internet access for some applications. For example,
your Norton product notifies you about an application that tries to connect to the Internet. You
can block the Internet connection for the application to prevent it from sending or receiving
any malicious information.
You can use the Application Blocking window to configure the Internet access for an
application. The selected application appears in the Settings list in the Application Blocking
window. The application name and the firewall setting that you select appear in the Settings
list in the Application Blocking window.
64Customizing settings
Set up firewall rules for an application on Mac

Set up firewall rules for an application
1
Start Norton.
If you see the My Norton window, next to Device Security, click Open.
2
In the Norton product main window, click Advanced or Settings.
3
On the left pane, click Firewall.
4
In the Application Blocking row, click the settings icon.
5
In the Application Blocking window, click Add application.
If the application that you want to choose does not appear in the list, click Other to search
for the application.
6
In the Choose Application dialog, select the required application.
7
Click Choose.
The name of the application that you have added appears in the Settings list in the
Application Blocking window.
8
Click Done.
Remove the firewall rule for an application on Mac
You can use the Application Blocking window to remove some of the firewall rules if
necessary.
Note: Do not remove a firewall rule unless you are an advanced user. Removing a firewall rule
can affect firewall functionality and reduce the security of your Mac.
Remove the firewall rule for an application
1
In the Application Blocking window, select the application name row.
2
Click Remove.
3
In the confirmation window, click Remove.
4
Click Done.
Location Awareness settings for Mac
Location Awareness settings lets you configure the firewall settings based on the network
location to which your Mac is connected. The firewall settings that you configure contains the
connection blocking settings for the application and services that run on your Mac. When you
65Customizing settings
Remove the firewall rule for an application on Mac

connect your portable Mac to a new network location, your Norton product prompts you to
select a new firewall setting for the network location.
You can use the Location Awareness window to do the following:
■ Turn on or turn off the Location Awareness feature.
■ View the current network location to which your Mac is connected.
Disable or enable Location Awareness on Mac
The Location Awareness feature lets you set the Connection Blocking settings for every
network that your Mac connects to. By default, the network to which your Mac is connected
when you install your Norton product is categorized as Trusted. When you connect your Mac
to weaker or vulnerable networks, your Norton product categorizes those networks as
Untrusted. However, if you think a network is safe and trustworthy, you can change the network
category to Trusted.
You can disable or enable the Location Awareness feature from the Advanced window.
Disable or enable Location Awareness
1
Start Norton.
If you see the My Norton window, next to Device Security, click Open.
2
In the Norton product main window, click Advanced or Settings.
3
On the left pane, click Firewall.
4
In the Location Awareness row, move the switch to off or on.
Export the connection blocking settings for a network
location
You can export the network location settings using the Export window. You can use the Export
option present under the File menu in the Norton product menu bar. Your Norton product
exports the network location settings as .npfx file format.
You can use the following options to export the network locations settings:
Lets you export all of the settings of the selected
network location
Export all settings
66Customizing settings
Disable or enable Location Awareness on Mac

Lets you export only the required settings of the
selected network location Your options are:
■ Application Blocking
■ Connection Blocking
■ Applications
■ Services & Ports
■ Zones
■ Vulnerability Protection
■ Norton DeepSight
TM
Community Download
Export only these settings
Lets you add a password to protect the exported
file.
Password protect the exported settings
Note: You can use the Password protect the exported settings check box to protect the
exported network location settings.
You can import the saved settings later to view it or apply to another computer that has the
Norton product.
Export the connection blocking settings for a network location
1
In the Norton QuickMenu, click Open Norton Security.
2
On the Norton product menu bar, click File > Export.
3
In the Export window, select the export option as required.
4
Click Export.
Stop background tasks when you play games or watch
movies on Mac
When you perform important tasks, watch movies, or play games in full-screen mode, you can
set Norton to stop sending alert messages and suspend background tasks that slow
performance. To do so, just turn on Silent Mode.
Turn off or turn on Silent Mode
1
Start Norton.
If you see the My Norton window, next to Device Security, click Open.
2
In the Norton main window, click Advanced or Settings.
3
On the left pane, click Product Settings.
4
In the Silent Mode row, move the switch to off or on.
67Customizing settings
Stop background tasks when you play games or watch movies on Mac

Finding additional solutions
This chapter includes the following topics:
■ Check for virus names and definitions
■ Find your product key or PIN for Mac
■ Check your Mac user account type
■ Uninstall Norton device security on Mac
Check for virus names and definitions
The Virus Definitions window lists the names of viruses and their details. To know if your
Mac is protected from a particular virus, you can search for the virus name. By default, Norton
automatically updates virus definitions on a regular basis.
You can select each of the viruses and click the impact i icon to see how severe the virus
might affect your Mac, when infected. You can click Learn More to read the summary. The
summary of each virus is displayed on a separate webpage.
Check for virus names and definitions
1
Start Norton.
If you see the My Norton window, next to Device Security, click Open.
2
In the Norton main window, click Advanced or Settings.
3
On the left pane, click Protect my Mac.
4
In the Virus Definitions row, click the settings icon.
5
In the Virus Definitions window, type the name or part of the name of the virus in the
search field. Your Norton product displays all the related viruses. You can click on the
virus for which you want to know more information.
6
Click Done.
10
Chapter

More Information
◆
See “Change Norton Automatic Scans settings on Mac” on page 23.■
Find your product key or PIN for Mac
This article helps you locate the product key or PIN that you need to activate or renew your
Norton product:
■ Product key: A 25-character alphanumeric string shown in five groups of five characters
each, separated by hyphens, that you need to activate or renew your Norton subscription.
Your service provider may send the PIN to your registered email address. If you do not see
the email, check your spam or junk folder. If you still cannot locate your PIN, contact your
service provider.
■ If the product came pre-installed, your product key might be already stored in the product.
All you need is to register your product with your Norton account. Once registered, you can
get the product key by signing into your account. Some manufacturers may provide the
product key on an activation card. If you have any problems, contact your device
manufacturer.
■ If you purchased your Norton product from a third-party website, look for the product key
in the order confirmation email. If you do not find the email in your Inbox, check your spam
or junk folder.
■ If you received a product key card, your product key is printed on the card along with
instructions on how to use it.
■ If you purchased a Norton card from a retail store, your product key is printed at the back
of the Norton card.
Check your Mac user account type
A user account defines the actions a user can perform on a Mac. You can create the following
types of user accounts on your Mac:
■ Administrator account
■ Standard account
■ Managed account
Each account has different privileges. An administrator account gives you access to all areas
of the Mac, install and update software, create and maintain other user accounts.
If you do not know your user account type, you can check it in System Preferences.
69Finding additional solutions
Find your product key or PIN for Mac
Check your Mac user account type
1
On the Apple menu, click System Preferences.
2
Click Users & Groups.
3
On the left side of the Users & Groups window, view your account name and account
type.
Uninstall Norton device security on Mac
To uninstall Norton, you must know the Administrator account user name and password.
You must restart your Mac after you uninstall Norton.
Note: To ensure continuous protection, Norton recommends you to keep your Norton device
security application installed on your Mac.
Uninstall Norton on macOS 10.14.x (Mojave) or earlier
1
On the Mac menu bar, click the Norton icon, and then click Open Norton.
2
In the Norton menu, click Norton > Uninstall Norton.
3
In the window that appears, click Uninstall.
4
When prompted, type your administrator account password.
5
Click Restart Now.
Uninstall Norton on macOS 10.15.x (Catalina) or later
Note: Before you follow the below steps, ensure that you close your Norton application, if it is
already opened.
1
On your Mac, click the Finder icon
in the dock, and then click Applications in the left pane under Favorites section.
2
Find the Norton application icon, and drag it to the Trash or Bin.
3
Click Continue.
4
When prompted, type your administrator account password, and then click OK.
5
In the window that appears, click Uninstall.
70Finding additional solutions
Uninstall Norton device security on Mac

6
When prompted, type your administrator account password, and then click Install Helper.
7
Click Restart Now.
71Finding additional solutions
Uninstall Norton device security on Mac
